Post by EvilDunkin on Jun 2, 2006 23:21:43 GMT -5
Ok before I start I want to say that I DID NOT write this tutorial, sadly I do no have PS at the moment and couldn't write it out with pictures and everything, but I did find this one tutorial that I had used when I wanted to learn about coloring in PS ALL CREDITS GO TO DEMONESS @ demonss.cosmocycle.com
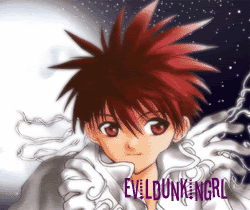
I scanned a picture that I drew a while ago and used it for this tutorial. If you are going to scan a picture, you wouldn't want the smudges all around your picture to appear in your final product. So, if you are going to scan it, make sure you have outlined your picture with a black pen or marker because otherwise it won't look very good when you colour it.
You could be thinking, ok, why are you giving me a tutorial on colouring? Well, I'm doing this because it's "hard" to know how to colour in Photoshop without using the right steps. If you just take a picture and start to colour, it would be very hard to avoid colouringover those beautiful black lines of yours. So to do this, read on...
STEP 1
Open your file, reset your colours (Ctrl + D), and make the Mode Grayscale (Image>Mode>Grayscale). Next, go to Image>Adjustments>Brightness and Contrast. Fix the settings so you can see most of the gray smudges gone and the black line is perfectlyblack. Play around with it but if you are lost, the settings I used were Brightness: 13 and Contrast: 33.
STEP 2
Look over to your colours palette and make sure you have black in the foreground and white in the background. Make sure your Layers window is visible and click on the Channels tab. You will notice that there is one bar there, it's called Gray and to the right it says Ctrl + 1. Hold down Ctrl and click on that bar.
STEP 3
Next, your picture will have these funky or squiggly lines all over it. Go to Select>Inverse. Then switch your foreground and background colours so white is in the front and black is in the back.Don't deselect, click on the layers tab and create a new layer. By pressing the button to the left of the trash can. Click on the Layer 1 bar and hit Ctrl + Backspace.
STEP 4
Switch your colours again so white is in the back and black is in the front. Click on the Background bar in the layers palette. Hit Ctrl + A and Delete.
STEP 5
Go to Image>Mode>RGB Colour and when a prompt comes up asking you to flatten. DON'T. If you do, it makes all your previous work worthless.
STEP 6
Rename Layer 1 to "Lines". Do not touch the Lines layer or the Background layer. Click background layer and then create a new layer. Continue this until you have about 4 or 5.
STEP 7
Name them different things like, Skin, Hair, Hat, Eyes, and Clothes. This just helps you to organize a bit.
STEP 8
Let's start with the Skin, ok so click on your Skin Layer and choose your brush. I use the paintbrush brush most of the time because it looks less blocky. But choose whichever and choose a Base Colour for your person. If you really don't know what to do, I chose #FBDDC3.
STEP 9
Colour in your Skin... next we are going to put in highlights and shadows. Look at the tool bar. Look on the right side, second tool. That is the Magic Wand Tool. Select it and then click on your newly coloured skin. This selects the whole section that is coloured that colour. Next, one down and to the right of the eraser tool are the: Burn, Dodge and
Sponge tools. Click on the Burn tool and add in the shadows of your skin. The outline around your skin are to keep your burning only on that colour, this comes in handy the closer you are to the end of the picture. Next, choose the Dodge tool and add in your highlights. (Where the sun hits the person's face)
STEP 10
Repeat all the steps above until you have finished your whole picture. Once you are done, go to Layer>Flatten Image and you are done! Congratulations you coloured a picture.
AND thats it, REMEMBER I DID NOT MAKE THIS TUTORIAL!!!